Creating an Evaluation
Step 1: Evaluation Details
The first step in creating a new evaluation is setting up the core details. This information helps identify the event and ensures your data is organized correctly for future reporting.
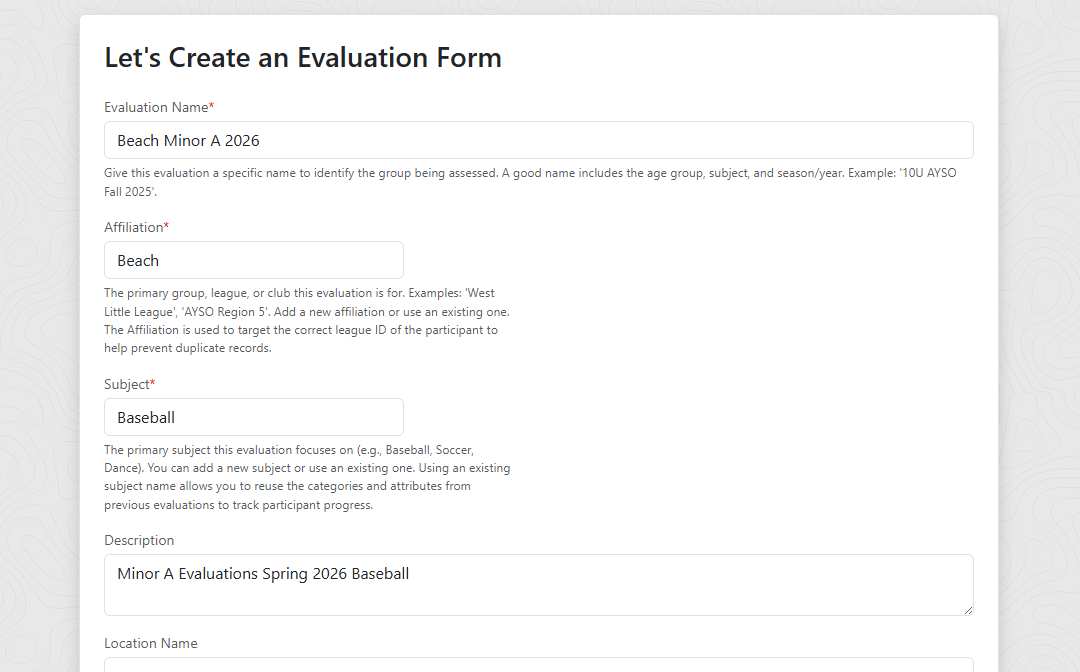
- Evaluation Name: Give your evaluation a specific name that is easy to identify later (e.g., "10U AYSO Fall 2024").
-
Affiliation: Type the league name, group or club this evaluation belongs to (e.g., "West Little League", “AYSO”). Pro Tip: The Affiliation helps the system target the correct League IDs (when provided) for participants when importing, helping prevent duplicate records. You might have a participant that is part of multiple affiliations for different sports and with the correct affiliations you can see all of their information in one spot.
-
Subject: Type the primary sport or activity (e.g., "Soccer", "Dance", "Baseball"). Pro Tip: Using an existing Subject allows you to reuse categories and attributes from previous evaluations. This allows you to see how a participant performs over time or multiple evaluations.
-
Location & Schedule: Enter the location details (Name, Address) and the Start/End dates.
Pro Tip: The "Start Date" and "End Date" do not determine or automatically change when participants are allowed to be evaluated. The evaluation status locks or allows evaluations. Why? When sharing evaluations some evaluators might already know what ratings they will put for specific players beforehand. When an evaluation is set to ‘Active’, evaluators are allowed to submit evaluations.
Step 2: Participants
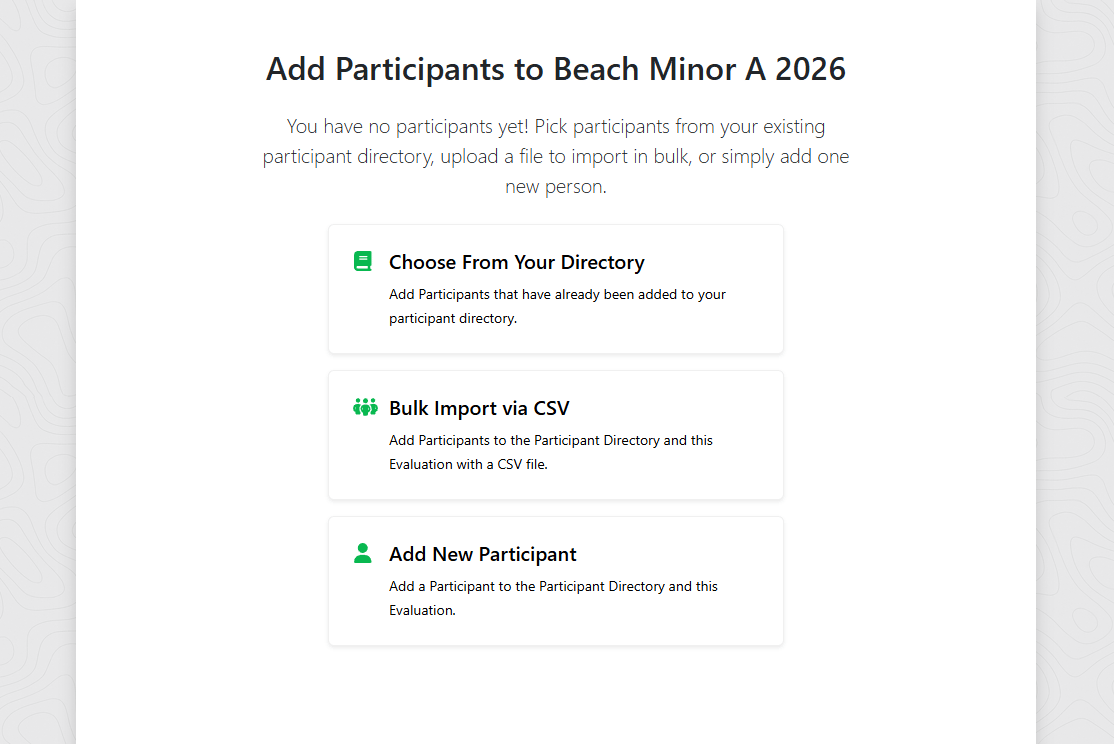
You have three ways to add participants to your evaluation:
- Choose From Directory: If you have evaluated participants before, they are already in your Participant Directory. Search for them by name in the directory list. Click a participant to move them into the current evaluation.
- Add New Participant: Manually add a single person by entering their details (Name, Date of Birth, Affiliation/League ID).
- Bulk Import via CSV: This is the fastest way to add a large roster.
How to Import Participants via CSV
- Upload: The importer only supports importing .csv spreadsheet files. Drag and drop or select your .csv file into the uploader.
-
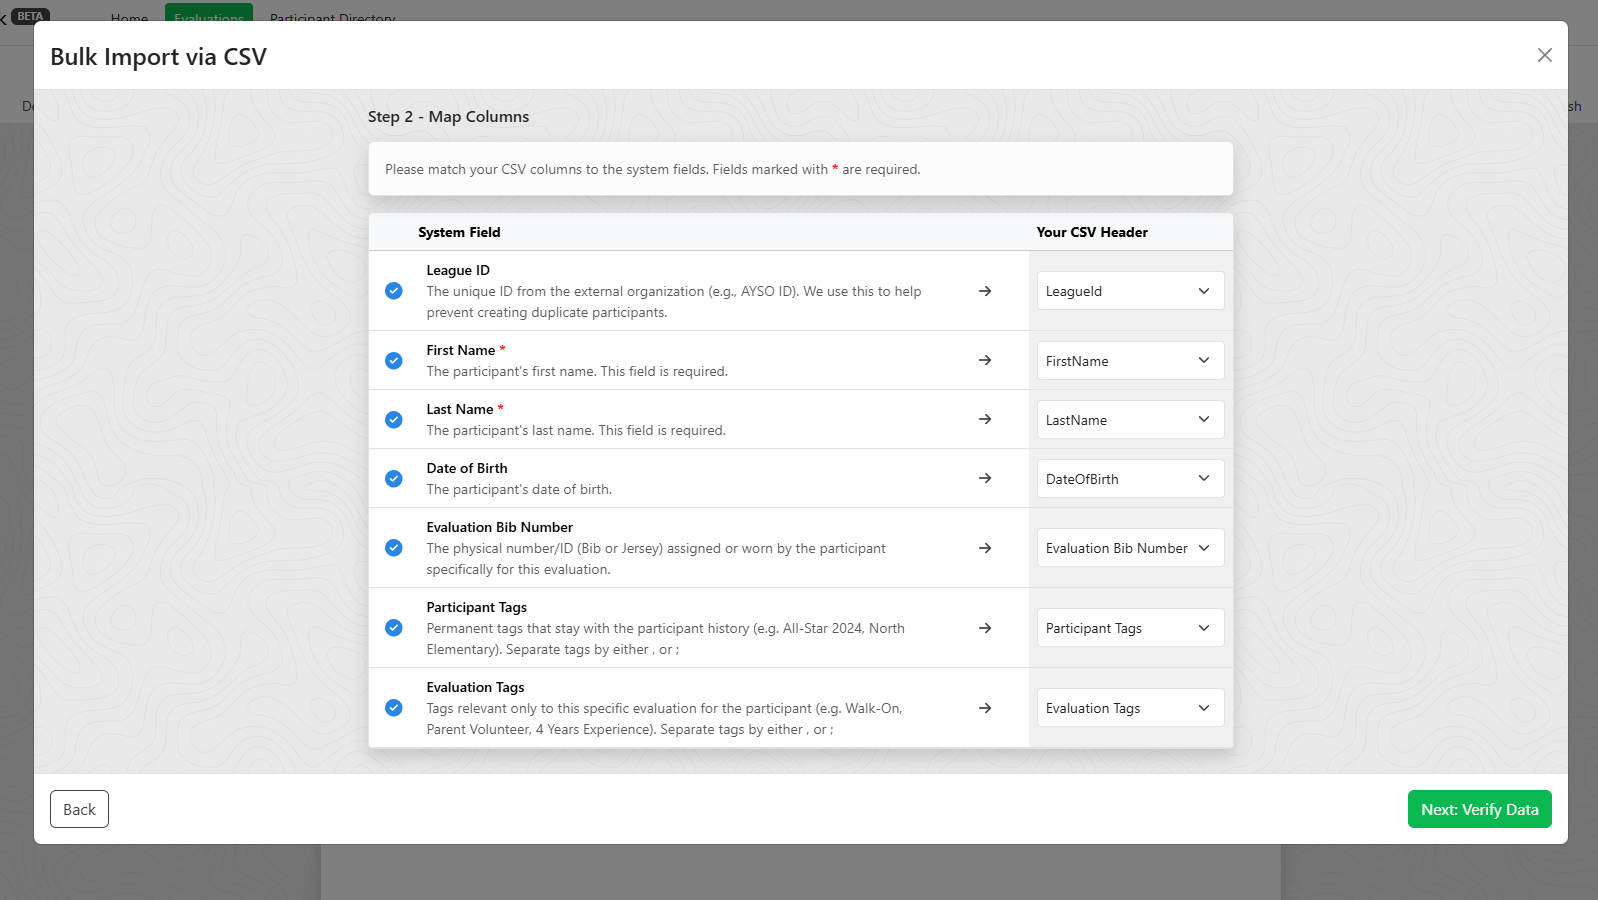
Map Columns: The system will try to automatically match your headers. Ensure the following are available to be mapped:
- First Name & Last Name (Required)
- League ID (Recommended: helps prevent duplicates)
- Evaluation Bib Number (The number the player is wearing for the evaluation)
- Group: Optionally assign each participant to a group as they're imported. If you're importing an entire league that shares one evaluation form, a group column separates everyone into their divisions (e.g., "Boys Under 10", "Girls Under 10") — groups are created automatically from the values in your file. See Organizing Participants into Groups below for what groups unlock.
- Tags: Tags are informational bits that can be used to help you choose between participants during your draft. Tags should be separated by a , or ; to be properly parsed by the system. You can add Tag columns for:
-
Permanent Tags: These are tags that stay with the participant throughout their evaluation history. (e.g., 2025 All Star, Left Footed, Schools Attended)
-
Evaluation Tags: These are tags that are specific to the participant at the time of the evaluation. (e.g., Walk-On, Team Parent, 3 Years Experience, 5th Grade)
-
-
Review & Process: The system will compare your file against existing participant directory records.
- Matches: If a match is found (by League ID or Name and DOB), you can choose to use the existing participant record and import any new tags given to the participant.
- New: If no match is found, you can import them as a new participant and add them to the evaluation.
- Errors: Any invalid records will be flagged for you to fix.
Organizing Participants into Groups
If you are evaluating everyone at once — even participants from different divisions or age brackets — you can assign each participant to a Group (e.g., "U10 Boys", "Division 2"). One big evaluation with groups is often easier to run than several small ones, and groups make everything downstream simpler:
- Filter reports by group, so you can view rankings for one division at a time.
- Score within the group: reports can optionally rank a participant against only their own group instead of the whole pool.
- Team building by group: Team Builder sessions can be filtered to a single group, so you can build each division's teams from the one evaluation (see the Team Builder guide).
Each participant can belong to one group per evaluation. You can assign groups three ways:
- While editing a participant, using the group selector — type a new name to create a group on the fly.
- During CSV import, by mapping a group column — groups are created automatically from the values in your file.
- The Manage Groups view, a spreadsheet-style matrix on the participants step that lets you assign every participant to a group with one click per row.
Step 3: Form Builder
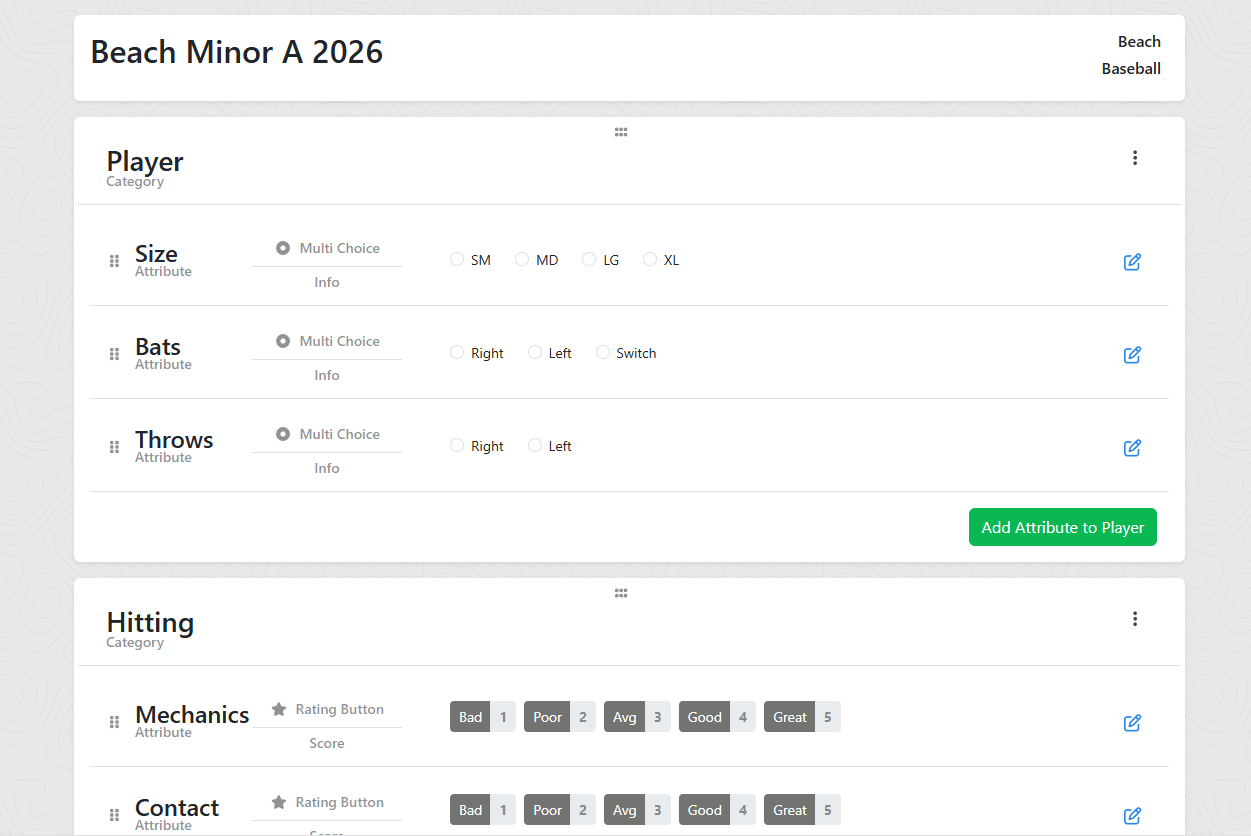
This is where you define what you are evaluating and how you want to evaluate it. You can start from scratch, use a template, or copy a form from a previous evaluation.
Categories
Think of a Category as a bucket or organizer for related skills (e.g., "Hitting", "Pitching", "Defense") for the Subject you are evaluating.
- Add Category: Create a new Category or select from a list of categories used in previous evaluations for the selected Subject.
- Order: Drag and drop categories with the drag handle icon to determine the order they appear on the evaluator's screen.
Attributes
Attributes are the specific skills within a category (e.g., inside "Hitting", you might have “Mechanics”, "Power", "Contact").
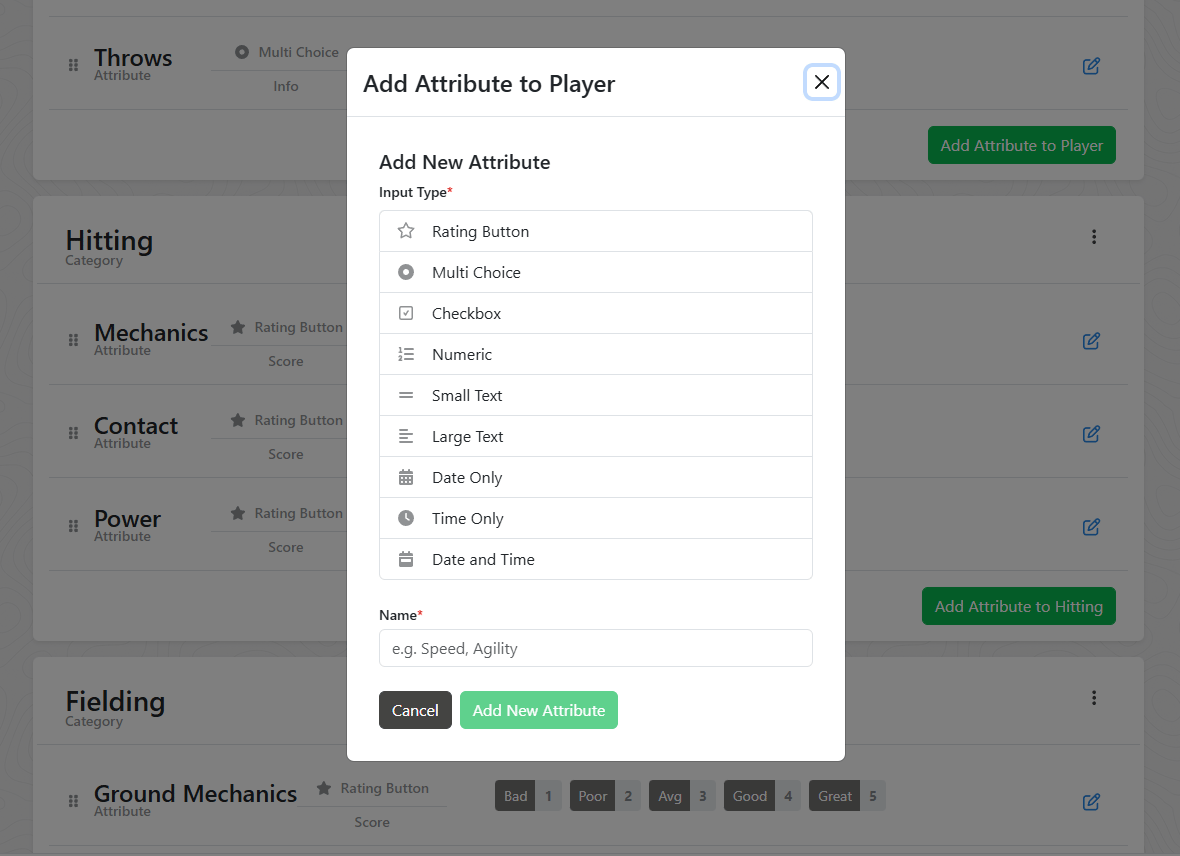
Input Types
Choose how the evaluator will interact with the form. There are four families of inputs:
Selection inputs — the evaluator picks from options you define
- Rating Select: One-click buttons for common ratings or observations (e.g., '5', 'Good', 'Needs Improvement'). Default buttons are labeled with descriptive names and scored 1 through 5, but you can rename every label and change its point value.
- Radio Select: A single choice from a set of radio buttons (e.g., "Proper Stance: Yes / Partial / No").
- Yes/No Switch: A simple two-option toggle. Each side can carry its own point value.
- Checkbox Select: Check every option that applies — for example, steps you want to see completed during a drill or positions the participant has experience at.
- Dropdown Select: A single choice from a dropdown list. Best when the option list is long.
Numeric & timed inputs
- Numeric Input: Type a number directly — a rating value (e.g. 1 through 5) or a measured stat (e.g., "Exit Velocity", "Vertical Jump"). You can enforce Min/Max limits and use a slider for easier mobile use.
- Stopwatch: Time sprints and drills with a built-in stopwatch — start, stop, and lock the time right on the form, or type a time in manually.
Text inputs
- Short Text Input: A single line for quick observations.
- Long Text Input: A full note box for detailed comments.
Date & time inputs
- Date Input: A calendar date (e.g., a document-verification date).
- Time of Day Input: A clock time (e.g., a check-in time).
- Date and Time Input: Both together.
Value Types — How Scoring Works
Every attribute also has a Value Type, and this is what decides whether the attribute counts toward the participant's ranking score or is purely informational:
- Score: Counts toward the ranking. The point value entered (or the point value of the selected option) is added into the category total and the overall score.
- Scored Measurement: Counts toward the ranking. A raw measurement (a 40-yard dash time, a vertical jump height) is automatically converted into a score by comparing the participant against everyone else — see below.
- Measurement: Informational. The raw number is shown in reports for sorting and comparison, but is never added into the ranking score.
- Info: Informational. Descriptive reference data only (positions played, throwing hand, notes).
What each input type supports:
| Input Type | Can it count toward the ranking? | How it scores |
|---|---|---|
| Rating, Radio, Yes/No, Checkbox, Dropdown | Yes — as a Score | The point value you assign to each option |
| Numeric Input | Yes — as a Score or a Scored Measurement | The entered number directly, or converted via percentile ranking |
| Stopwatch | Yes — as a Scored Measurement (the default) | The recorded time converted via percentile ranking |
| Text, Date, Time | No — informational | Shown in reports and the stats grid only |
Scored Measurement is only available on Numeric Input and Stopwatch attributes, since it needs a raw number to rank participants by.
Weighting: making one attribute worth more than another
Because you control every option's point value, you can weight your form however you like. Want "Hitting Power" to matter twice as much as "Bunting"? Give its rating options values of 2, 4, 6, 8, 10 while Bunting stays at 1–5. You can also rename what the evaluator sees — change "1" to "Poor" and "5" to "Excellent" — while keeping the point values underneath.
How a Scored Measurement becomes a score
For a Scored Measurement you declare a Score Range — the minimum and maximum points the attribute can award (default 1–10). When results are calculated, each participant's measurement is compared against every other participant's, and their percentile rank is scaled into that range:
- The best measurement in the pool earns the maximum score, the worst earns the minimum, and everyone else lands proportionally in between. Participants with identical measurements receive identical scores.
- The Optimal Direction setting controls which end is "best": Lower Is Better for sprint and dash times, Higher Is Better for plank holds, jumps, or exit velocity.
- The Score Range doubles as a weighting tool — a 40-yard dash with a 1–20 range influences the overall ranking twice as much as an attribute scored 1–10.
Repeating Entries with Multiple Sets
Some things are measured once — height, a single dash time. Others are measured several times in a row: five pitches, three long jump attempts, two timed sprints. Turning on Allow Multiple Sets lets an evaluator record several entries instead of overwriting a single value. Sets are added during the evaluation as they are needed, so you don't have to decide up front how many attempts each participant will get.
The switch appears in two places, and which one you use depends on how much repeats:
On an Attribute
Use this when one skill is measured repeatedly while everything around it is recorded once. Toggle Allow Multiple Sets in that attribute's settings.
Example: A “Pitch Speed” attribute. The evaluator clocks all five pitches — 62, 64, 61, 65, 63 mph — on that single attribute.
On a Category
Use this when a whole group of attributes repeats together, so every repetition captures the full picture. Toggle Allow Multiple Sets on the category itself.
Example: A “Pitching” category holding Speed, Ball or Strike, and Location. Each set is one complete pitch — the evaluator fills in all three, then adds a set for the next pitch.
On the evaluator's form, each repetition is labeled Set 1, Set 2, and so on, so it stays clear which attempt is which.
Combining sets into one result
Once Allow Multiple Sets is on — whether on the attribute or on its category — the attribute gains a setting that decides how those entries collapse into the one value used in reports and rankings. It is labeled Score Calculation on attributes that count toward the ranking (Score and Scored Measurement) and Measurement Aggregation on informational Measurement attributes. The choices are the same either way:
| Setting | What it uses | Reach for it when… |
|---|---|---|
| Average of all attempts | The mean of every set | Consistency is what you care about — the pitcher who throws 62–65 every single time |
| Total of All Attempts | Every set added together | You are counting things up: points scored across five rounds, reps completed, goals made |
| Highest Result | The largest value recorded | Best effort wins — longest jump, top velocity, highest vertical |
| Lowest Result | The smallest value recorded | Lower is better — fastest sprint or shuttle time |
| Most Recent Attempt Only | Just the last set entered | The earlier sets were warm-ups or practice and shouldn't count |
For a Scored Measurement, the sets are combined first, and that combined number is what gets compared against the other participants for percentile scoring.
Step 4: Publish & Share
Once your form is built and participants are added, you are ready to invite evaluators unless the evaluation is just for yourself.
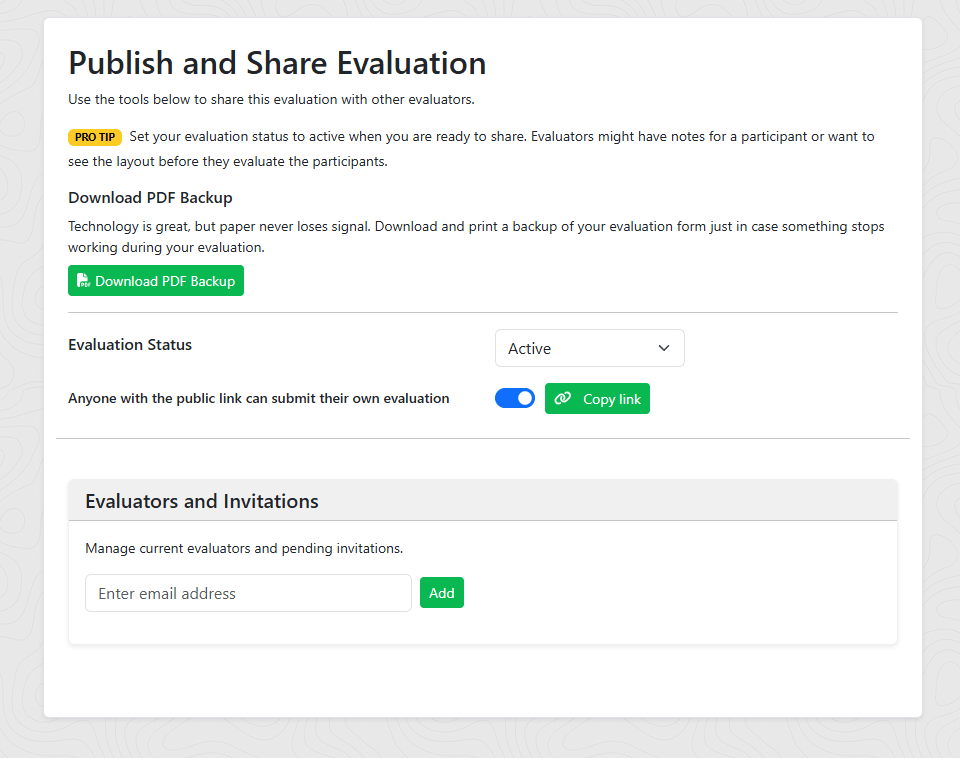
- Enable Link: Toggle this on to generate a unique URL for your evaluation.
- Copy Link: Any user with this link can create an account (or sign in) and immediately have access to use your evaluation form to evaluate the participants.
Invite Users: Enter email addresses to have the system send direct invitations.
Manage Access:
- Resend: If a user hasn't accepted yet, you can resend the invite email.
- Revoke: Remove a user's access. If they joined via a public link, you may need to disable the public link to prevent them from re-joining.
You can download a formatted PDF of your evaluation form to use as a paper backup. This is useful for offline environments or evaluators who prefer taking notes by hand.